
Help Guide Edition No. 2.0
The “Lens Compensation”-application allows you to correct the intensity of peripheral light, lateral chromatic aberrations, and distortion of the lens even if the attached lens does not support automatic correction functions. After you register correction values as a lens profile, the camera will always shoot still images and movies using the same correction values. You can use the created profiles on other cameras by exporting the profiles to a memory card.
Creating a lens profile
You can create a profile for each combination of the focal length and aperture value.
-
Mount the lens (on the camera) whose profile you want to register and manually set the desired focal length and aperture value for the lens.
-
Select MENU → [Application] → [Lens Compensation].
-
Select [Create New] from [Lens Profile List] and press
 on the center.
 -
Enter the lens name, focal length, and aperture value for the profile to be created.
- Enter the focal length and aperture value of the lens set in step
1.
The focal length and aperture value you enter at this step do not affect the correction process.
- Use the virtual keyboard to enter the values. Select lens name (A), focal length (B) and aperture value (C), and press on the center to display the virtual keyboard. If you are using a model which is equipped with a touch panel, you can operate the virtual keyboard by touching the panel.

Profile editing screen
Virtual keyboard - Enter the focal length and aperture value of the lens set in step
1.
-
Select the item to be corrected and set the correction value.
Setting items Description [Peripheral Shading] You can correct lens-specific phenomena that cause peripheral areas of the image to become dark or that cause a color imbalance. 
→ 
Sets the correction values for peripheral brightness and peripheral red and blue light intensity while confirming the effect on the monitor.
Brightness: Move the slider in the + or − direction to increase or decrease peripheral brightness.
Red: Move the slider in the + or − direction to increase peripheral red or cyan light intensity.
Blue: Move the slider in the + or − direction to increase peripheral blue or yellow light intensity.
[Chromatic Aberration] When shooting a subject with high contrast, you can correct the lens-specific color drift that occurs around the outline of the subject in the peripheral areas of the image. 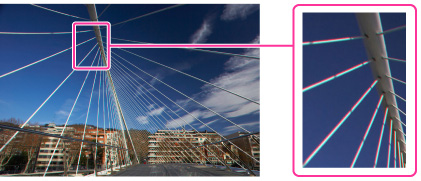
→ 
Sets the correction values for lateral chromatic aberration for red and lateral chromatic aberration for blue.
Red: Move the slider in the + or − direction to move redness away from an image or to the center of an image.
Blue: Move the slider in the + or − direction to move blue away from an image or to the center of an image.
[Distortion] You can correct image distortions that are caused by the characteristics of a lens. 
→ 
Set the correction values for barrel and pincushion type distortions while confirming the effect on the monitor.
Move the slider in the + or − direction to correct barrel or pincushion distortion.
- You can choose to turn on/off the grid line by pressing [
 Grid Line]. (On some models,
  (Soft key B) is displayed instead of .)
- You can choose to turn on/off the grid line by pressing [
-
Select [SAVE] and then press
on the center.The profile is saved and the shooting screen is displayed.
- If you do not want to save the profile, press
 to
return to [Lens Profile List].
to
return to [Lens Profile List]. - By pressing [Option] in [Lens Profile List] screen, the profile can be re-edited, deleted or exported to a memory card. (On some models, (Soft key B) is displayed instead of .)
- If you do not want to save the profile, press
Notes
- The chromatic aberration effect is not previewed on the correction value setting screen or the shooting screen. After setting the correction values, perform another test shoot and confirm the correction result by displaying the enlarged image in order to perform fine adjustments.
- You can register up to 100 lens profiles on a camera.
- Lens profiles that were created on a previous version of this application can be used on the current one.
- Even if this application is uninstalled, the camera memory will continue to store the created lens profile. To delete the lens profile, use the delete function of this application.
- The lens profile data is saved in the camera memory when you turn off the camera. If you remove the battery while the camera is turned on, the lens profile data will not be saved.
Exporting a lens profile to a memory card
-
Insert a memory card into the camera.
-
Select MENU → [Application] → [Lens Compensation].
-
From [Lens Profile List], select the lens profile that you want to export and press [
Option].- On some models, (Soft key B) is displayed instead of .
- On some models,
-
Select [Export] and then press
on the center. -
Select [Export] on the confirmation screen and then press
on the center.The selected lens profile is saved to the memory card.
- The destination folder and file name of the saved profile data are as follows.
- Destination folder:
When you are using a Memory Stick: /MSSONY/CAM_APPS/APP_LC/PROFILE/
When you are using an SD card: /PRIVATE/SONY/APP_LC/PROFILE/
- File name: “LENS0001.BIN” - “LENS0200.BIN”
- Destination folder:
- The destination folder and file name of the saved profile data are as follows.
Notes
- You can save up to 200 lens profiles on a memory card.
- To delete a lens profile saved on a memory card, select MENU → [Delete Export File] → the lens profile you want to delete and then press [Delete]. (On some models, (Soft key B) is displayed instead of .)
- You cannot export a lens profile when the memory card does not have enough capacity.
- You cannot export a lens profile when the lock switch of the memory card is set to the “LOCK” position.
Importing a lens profile from a memory card
-
Insert a memory card which contains a lens profile into the camera.
-
Select MENU → [Application] → [Lens Compensation].
-
Select [Import] from [Lens Profile List] and then press
on the center.A list of lens profiles saved on the memory card will be displayed.
- Only profiles saved to the memory card folders shown below will be displayed.
When you are using a Memory Stick: /MSSONY/CAM_APPS/APP_LC/PROFILE/
When you are using an SD card: /PRIVATE/SONY/APP_LC/PROFILE/
- Only files whose names are “LENS0001.BIN” - “LENS0200.BIN” can be imported.
- Only profiles saved to the memory card folders shown below will be displayed.
-
Select a lens profile you want to import and then press
on the center. -
Select [Import] on the confirmation screen and then press
on the center.The selected lens profile will be imported to the camera.
Shooting images
-
Mount a lens registered in the lens profile on your camera.
-
Select MENU → [Application] → [Lens Compensation].
-
Select the profile of the mounted lens from [Lens Profile List] and press
on the center. -
To shoot still images, press the shutter button. To shoot movies, press the MOVIE button.
- When the camera is set to MF, you can use the MF assist function
while shooting if you select
 . The lens correction
effect will not be applied on the screen while the MF assist function is being
used.
. The lens correction
effect will not be applied on the screen while the MF assist function is being
used. - When the [Live View Display] of the camera is set to [Setting Effect ON], the peripheral shading and distortion effects are previewed on the live view screen. When the [Live View Display] of the camera is set to [Setting Effect OFF], only the distortion effect is previewed on the live view screen.
- When the camera is set to MF, you can use the MF assist function
while shooting if you select
-
To exit the [Lens Compensation] application, select MENU → [Exit Application] on the shooting information screen.
 To change other settings
You can change some of the shooting settings on the camera menu ([Image Size], [Quality], etc.) using MENU and other buttons before shooting an image. MENU items that can be set vary depending on the camera model.
Notes
- You may not be able to obtain the desired correction effect for some lenses or shooting conditions.
- When you shoot images using the lens profile settings of this application, automatic correction for peripheral light intensity and lateral chromatic aberration performed by the camera is canceled and the correction values set by this application are applied. In contrast, for distortion, both the value set by this application and the value adjusted by the camera are applied together.
- On some models, you cannot shoot movies with this application. For details, see below:
PlayMemories Camera Apps > Lens Compensation > Specifications - When you use a lens with no lens contacts, the aperture value set in the lens profile will be displayed on the shooting screen. Even if you change the aperture value of the lens while shooting, the aperture value displayed on the shooting screen will not change in accordance with the actual value.
- All images in this guide are representative images.
- Some camera setting items may need to be reset after launching this application. For further information about camera functions and settings supported by this application, see below:
PlayMemories Camera Apps > Lens Compensation > Specifications