
Help Guide Edition No. 1.0
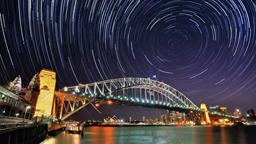
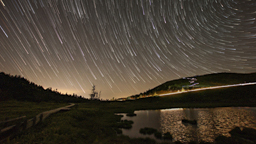
This application automatically shoots time-lapse intervals of a starlit sky, recording the moon and star trails in a motion picture. You can use the [Shooting Tips] and [Test Shot] functions to assist during complicated focus adjustments of the starlit sky.
Shooting
-
Select MENU → [Application] → [Star Trail].
-
Select a desired theme.
Theme Description Bright Night Shoots a starlit sky in a place with city lights or on a moonlight night.
Dark Night Shoots a starlit sky in dark locations by adjusting the shutter speed and ISO sensitivity.
Custom Shoots a starlit sky by setting the aperture and shutter speed. - When you press [OPTION] on the theme selection screen, you can perform the following settings.
Setting items Description File Format Selects the file format of a movie. Shots Sets the number of images to be automatically shot. Streaks Adjusts the length of the light trails. - When you press [Reset], the settings you made in the [OPTION] menu are returned to default values.
-
Select MENU to change the setting to your preferred setting, such as [Self-timer] and [Movie Size].
- When you set [Self-timer], the self-timer is activated before the first shot so that you can prevent image blurring caused by pressing the shutter button.
- When you select [Shooting Tips], tips are displayed for adjusting the focus using the manual focus mode to shoot a starlit sky.
-
Mount the camera on a tripod or similar device and determine the shooting direction and image composition.
-
Adjust the focus on the starlit sky.
- When you use the [Star Trail] application, focusing is always performed with the manual focus mode.
-
Press the shutter button to start shooting.
- When the number of images shot reaches the preset number of time-lapse shots, shooting stops automatically.
- Even during shooting, the shooting can be stopped by pressing the shutter button fully down or by pressing MENU.
- The movie is stored in the following directories as an AVI-format Motion JPEG file.
When using a Memory Stick: The file is saved in the directory under /MSSONY/CAM_APPS/APP_STRS/
When using a SD card: The file is saved in the directory under /PRIVATE/SONY/APP_STRS/
-
When you want to change to another theme, select MENU → [Application Top] to select a new theme.
-
To exit the [Star Trail] application, select MENU → [Exit Application].
-
To copy a movie file created using the [Star Trail] application to your computer, insert a memory card that contains the movie file into the computer, or connect the camera to the computer using a USB cable and copy the movie file using the latest version of PlayMemories Home.
Hint
Focusing on stars
Even if you turn the focus ring of a lens to the farthest side, normally you cannot focus at infinity (∞). Use the following procedure to focus on a subject while viewing the screen.
- Look for a bright star in the camera screen and use it as a reference star.
- Use [Focus Magnifier] or [MF Assist] to enlarge the image to maximum zoom and adjust the focus using the focus ring, so that the outline of the reference star becomes clearly visible.
- Press the
 on the center on the shooting information screen to display the [Focus Magnifier] screen.
 - When you press Test Shot, the [Test Shot] function is performed.
- Enlarge and play back the images shot by [Test Shot] to confirm whether they are in focus. If they are out of focus, perform the fine adjustment again.
- Images shot using the [Test Shot] function are not saved.
Hint
About the screen display during time-lapse shooting
You can set the screen display mode to be used during time-lapse shooting for the [Star Trail] application.
| For Star Trail Use | Displays information such as shooting settings of the camera, [Star Trail] settings (such as [File Format], [Shots], [Streaks], and [Duration]), and thumbnails of shot images. |
| Display Info. | Displays the shooting settings of the camera. |
| Deactivate Monitor | Does not display any information. Makes the screen dark. |
- When the screen display is set to [For viewfinder], the screen display mode is fixed to [Display Info.].
- You can switch the screen display mode by pressing the
 button during [Star Trail] shooting.
Notes
- When you select a theme, the recommended exposure suitable for the theme is applied automatically. The recommended exposure, however, may not be applied for certain lenses.
- In [Bright Night] theme, the exposure is adjusted according to the maximum/minimum value of the ISO AUTO setting. If you have changed the maximum/minimum value of the ISO AUTO setting, you might not be able to get the proper exposure. In that case, set the maximum/minimum value of the ISO AUTO setting to the default value and shoot again.
- To shoot the trail of stars beautifully in [Custom] theme, it is recommended to set the shutter speed to 3 seconds or longer.
- When using a lens equipped with a SteadyShot switch, turn off the SteadyShot switch on the lens.
- When using this application with NEX-5R, NEX-5T, or NEX-6, set [Long Exposure NR (Long Exposure Noise Reduction)] to [Off] before starting the application.
- The following functions are always fixed to off during [Star Trail] shooting.
- – [Smile/Face Detect.]
- – [Flash Mode]
- – [DRO/Auto HDR]
- – [SteadyShot]
- – [Long Exposure NR (Long Exposure Noise Reduction)] (except for NEX-5R/NEX-5T/NEX-6)
- Parts replacement due to excessive use may incur a charge.
- Movie files created using this application cannot be transferred to a computer or a Smartphone, etc. by Wi-Fi connection.
- When using the USB cable, if you do not follow the procedure above, you may not be able to copy the movie files to the computer. In such cases, set MENU → [Setup] → [USB Connection] → [Mass Storage].
- All illustrations in this guide are representative images.
- For further information about camera functions and settings supported by this application, see below.
PlayMemories Camera Apps > Star Trail > Specifications
Viewing a basic preview on the camera monitor
-
Select MENU → [Application] → [Star Trail].
-
Press the
 (Playback) button.
 -
Select the image you want to play back using
 /
/ .
. -
To exit the [Star Trail] application, press the
(Playback) button again to return to shooting screen and select MENU → [Exit Application].
Hint
- To better enjoy the movie shot with the [Star Trail] application, copy the movie file to a computer etc., and play it back on the device.
Notes
- Only movies shot using the [Star Trail] application can be played back while [Star Trail] is activated.
- You can view movies shot using [Star Trail] on a Sony television connected to the camera via an HDMI cable.
- When the image database file is deleted, image playback may not be possible in the [Star Trail] application.