
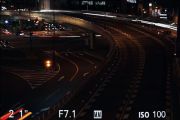
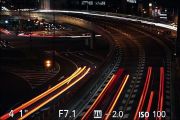
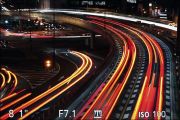
When shooting the headlights of a moving car or fireworks, the trailing light can be captured by combining and overlaying only the parts of the light that change over time.
Shooting
-
Set the shooting mode to S (Shutter Priority) or M (Manual Exposure).
-
Set the shutter speed.
- The shutter speed range may vary depending on the camera model.
-
Select MENU → [Application] → [Light Trail].
-
Secure the camera on a tripod and decide on the direction and composition of your shot.
-
Press the shutter button halfway down to adjust the focus.
- If it is difficult to focus on the subject, change to manual focus to adjust the focus and shoot the image.
-
Press the shutter button to start shooting.
- Continuous shooting starts at the shutter speed you have set, and a composite image appears on the screen throughout shooting.
- The mechanical shutter will remain open while shooting with this application.
 →
→ →
→
-
Check the monitor, and finish shooting when the light trail is long enough or the light is overlaid in your desired way.
- The maximum shooting time can be set from MENU. (30m/1h/3h/6h)
-
To exit the [Light Trail] application, select MENU → [Exit Application].
 To change the shooting mode
You can change how Light Trail starts and finishes shooting. Select MENU → [Shutter button] → your desired mode.
| Hold to expose | Exposes while you are holding down the shutter button. It is useful for short exposure times or when using a remote commander (RM-VPR1*, etc). * Only sold in certain countries/regions. |
| Press again to finish | Exposure starts when you press the shutter button, and finishes when you press the shutter button again. It is useful for long exposure times, etc. |
To shoot without pressing the shutter button (Touchless Shutter)
Set the [FINDER/MONITOR] to [Auto] before launching [Light Trail], then start the application and select MENU → [Touchless Shutter] → [On]. You can shoot an image by simply holding your hand close to the eye sensor to start and finish shooting.
- [Touchless Shutter] is not available for models without an eye sensor.
- [Touchless Shutter] cannot be used during HDMI connection.
To change other settings
You can change some of the shooting settings on the camera menu ([Image Size], [Quality], etc.) using MENU and other buttons before shooting an image. MENU items that can be set vary depending on the camera model.
Viewing
-
Press the
 (Playback) button.
 -
Press
 /
/ to select the Light Trail image you want to playback.
- You can also select a Light Trail image from the image index screen.
Notes
- If the cameraʼs internal temperature rises or if the battery runs out, the application may close after saving the image partway through shooting. It is recommended that you restart shooting after the temperature of the camera has decreased. If the shooting will take several hours, it is recommended that you shoot while supplying power via an AC adaptor.
- Noise reduction (Long Exposure NR) will be activated after shooting. You cannot shoot images while it is processing.
- When shooting with this application, [SteadyShot] will be [Off].
- When shooting with this application, [Power Save] settings on the camera will not activate.
- When using a lens with an aperture ring, set the shooting mode to M (Manual Exposure).
- The values recorded on the image are as follows:
- – Shutter speed: Total exposure time
- – Exposure mode: M (Manual Exposure)
- – Exposure compensation value: ±0.0
- The shutter speed displayed on the monitor and the actual exposure time may differ slightly.
- All images in this guide are representative images.
- Some camera setting items may need to be reset after launching this application. For further information about camera functions and settings supported by this application, see below:
PlayMemories Camera Apps > Light Trail > Specifications