Area Settings
You can adjust the boundary (position and defocusing of the boundary), exposure, and white balance settings for each area. In addition, area settings can be linked between areas.
Setting Method
See Step 4 of “Basic operation guide.”
- Use the control wheel, control dial, front dial, or rear dial to adjust the following settings. Which wheel/dial to use depends on the camera.
- Position and angle of the boundary line
- White balance type and color temperature
Boundary settings
Adjust the position and angle of the boundary line between the areas and the defocusing range of the boundary according to the composition.
Example: Setting the boundary line between the 1st area and 2nd area
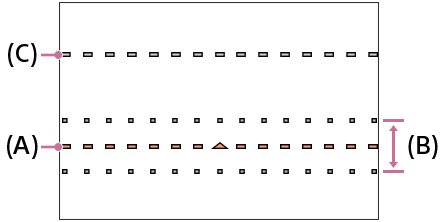
(A): Boundary line between 1st area and 2nd area
(B): Defocusing range of the boundary being set
(C): Boundary line of 3rd area
- You can also adjust the angle of the boundary line to make it vertical.
- The setting value range and degree of defocusing will vary depending on the camera.
Linked Settings
You can link shooting settings such as exposure and white balance between areas, and link the positions and defocusing ranges of the two boundary lines. Since this function lets you adjust the settings more quickly during shooting it is useful when shooting under conditions that change from moment to moment, such as during a sunset.
Move the cursor to the item you want to link on the [Area Settings] screen, and press the Fn (Link) button to display the linked setting screen for the selected item. You can also link/unlink an area on the [Area Settings] screen by aligning the cursor with the item you want to link/unlink on the [Area Settings] screen and pressing the  (Link) button.
Linked settings for boundary position and defocusing
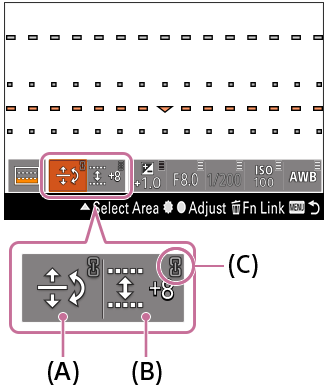
When the position of the boundary (A) or defocusing of the boundary (B) is linked, the  icon (C) to the top right of the item becomes brighter.
When the position of the boundary is linked, changes to the position and angle of one boundary line are reflected in the other boundary line.
When the defocusing of the boundary is linked, changes to the defocusing of one boundary line are reflected in the other boundary line.
Linked settings for exposure and white balance
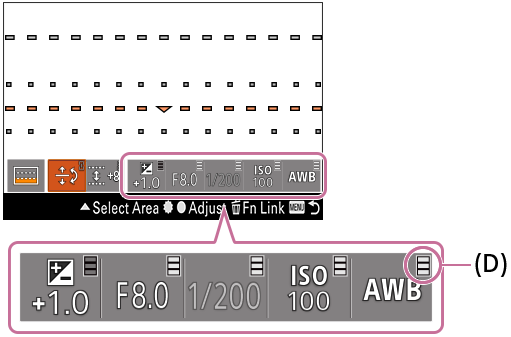
When the exposure and white balance settings are linked, you can check the linked status of each area using the link icon (D) to the top right of the item. The link icon (D) represents the 1st area/2nd area/3rd area in order from the bottom up. The linked area is displayed more brightly.
When you move the cursor to the exposure or white balance item and press the Fn (Link) button, the [Link Settings of Exposure&White Balance] screen is displayed. This menu is useful when you want to change the linked status of various items at once.
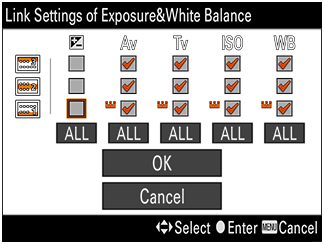
When you check the check box for an item, the setting value for the area with the  icon is applied, and the setting value is linked across the areas. If you change the setting for one of the linked areas, it will also be applied to the other areas.
If you select the [ALL] button, the linked status of the item will change for all the areas at once.
Histograms
If you enter the dedicated setting screen for the boundary ([Position of Boundary] and [Defocus of Boundary]) or exposure (exposure compensation, aperture, shutter speed, and ISO sensitivity) item by pressing the center of the control wheel, you can display two histograms.
In the case of [1st Area Settings] or [2nd Area Settings], the histogram shows the 2nd area on top and the 1st area on the bottom. For [3rd Area Settings], the histogram shows the 3rd area on top and a histogram combining the 1st area and 2nd area on the bottom.
You can display or hide the histograms by pressing the top of the control wheel on the dedicated setting screen for exposure.